
In The Studio: Mold-Making with Zoey Schorsch
My studio at 67 West St has morphed into many things over the last few years, but was originally intended to be a space for me to create, play and make a mess somewhere that wasn’t my apartment. I began working with silicone and plaster molds in 2022, just around the same time I started experimenting with mixed-media strategies that I had never paired together before. What began as prototype planning and quick, messy sketches in my notebook of pieces I wanted to make (not yet knowing how exactly I’d make them) quickly turned into a series of trials, errors, successes & discoveries.
I began my mold-making journey by envisioning the things I wanted to make, then working backward to figure out the steps I needed to take to get to the final output. I started with hand molding and took the opportunity to cast anyone’s hand who was willing to sit there for as long as the process required. The silicone mixture comes in two parts, Part A and Part B. I mix them in equal parts with a stirring stick and spread the mixture evenly over and around whatever body part I want it to take the shape of—in this case, hands that were folded, bent and scrunched in different poses and let it/my body models sit to dry. A plaster cast is then prepared, shaped and pasted around the silicone structure to help it keep its shape. If the silicone molds are well cared for, they can be used infinitely—and are fun to keep on display in the studio space as reminders of my progress within this medium.
Once the mold is formed (after setting for anywhere from 30 minutes to an hour) I can remove it from the body model. Making multiple hands and my first a paper chest plate took considerably less time than my largest project to date has taken so far: the full body mold/cast/paper sculpt. Because of this piece’s scale and density, it took almost a full two hours to completely set my model in silicone. Once my mixture was spread, plastered, dried and removed I began another round of prototyping—this time experimenting with different paper mixtures and base casts to form to the silicone mold. I started by molding paper prototypes of the torso/chest/breast region (creating the aforementioned chest piece) and was happy with the final result of this process until about 4 rounds into using different methods and mixtures. The smaller-scale trial and error that I walked myself through in this stage of the project helped save both time & materials when I began experimenting with full-cast pieces.

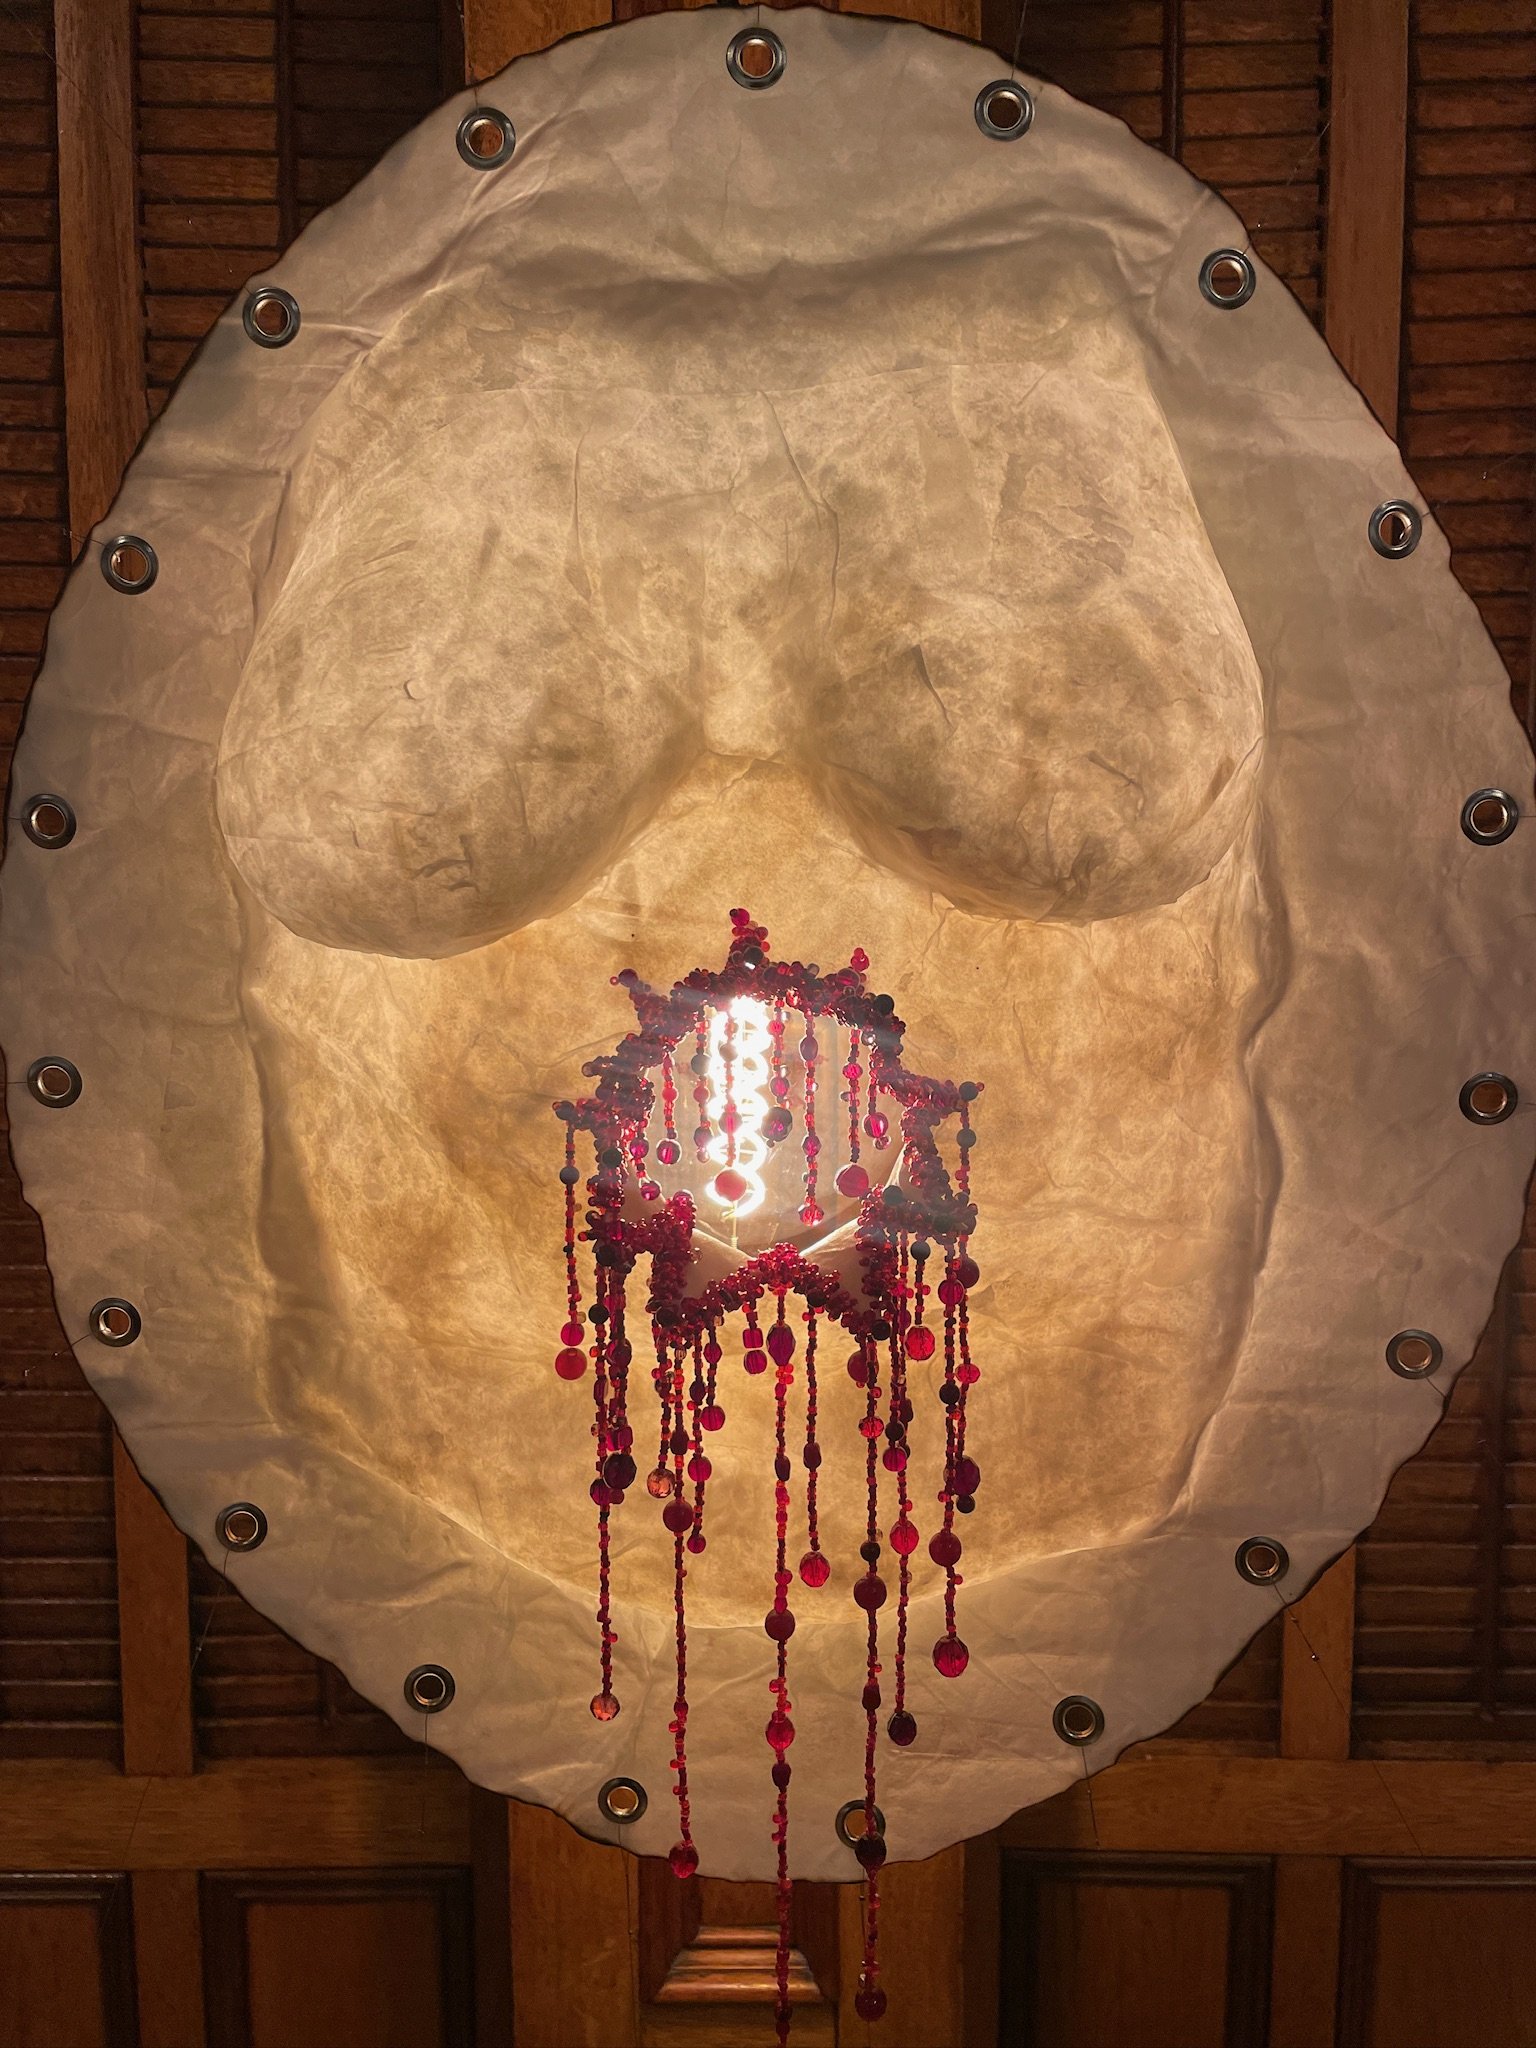

And at last, once the smaller-scale chest piece paper mold was complete, I punched a hole straight through it. I then sat with what could’ve easily been considered a ‘broken’ or ‘ruined’ piece, but coincidentally loved how it looked—torn and ripped through, open to newness, allowing change and accepting of deviation from my original plan. It was here that I decided to use what I had once considered just another small-scale chest piece (a small step leading me to a bigger picture) as a standalone piece of it’s own. This was my first step in the direction of embroidering on the paper busts and bodies, advancing the series’ conceptual design. I chose to embroider glass and crystal beads into the chest piece—materials chosen purposefully because of their interaction with light—adorning the tears in the paper that resulted from my punch. I then decided to suspend the final iteration in an abstract cage of piping using metal wire, helping to make the paper look more like stretched, scarred skin, and aiding in revealing it’s layered texture to the viewer. The final output of this piece, which was eventually titled Solar Plexus, utilizes a lightbulb suspended behind it, sending light not only through the punched hole’s center and into the dangling beads, but also providing a warm backlight for the entirety of the piece.
Every step that got me to the final form of the chest mold inherently inspired the steps I am taking in the ongoing creation of my full-body paper piece. After successfully molding the same paper mixture as the chest plate into the full body piece, I traced various American neo-traditional inspired tattoo designs onto the paper’s surface (arms, legs, chest, stomach, and all) and am still in the process of fully embroidering each sketch with multicolored glass and crystal beads—once again meant to interact with some sort of suspended light in its final form.
Although this piece is, at the moment, unfinished and unnamed, I have high hopes for its final output.
Interested in learning more about the specifics of my process, or seeing the pieces in their current iterations? Get in touch to find a time for a studio visit <3